One of those rare and mysterious plants that so many gardeners yearn for is turmeric. These lovely plants thrive indoors or outdoors with little care, and growing turmeric at home is surprisingly simple.
How to grow turmeric? In warm soil, plant turmeric in September or October. Rhizomes need to be buried 5-7 cm deep. It is frequently planted on ridges, typically 30 to 45 cm apart, with 15 to 30 cm separating plants. Setts, which are tiny rhizomes with one or two buds, are used to plant the crop.
This article describes how to cultivate, look after, and harvest turmeric. Keep reading!
Table of Contents
Different Turmeric Varieties
The turmeric that you will find sold in stores is almost always the deep orange variety of Curcuma longa. Here, we usually see it as “Hawaiian Red”. We have experimented with growing a couple of other varieties as well, including Indira Yellow and White Mango. A harvest of each of those three types of turmeric is depicted in the picture below. We have been planting fewer and fewer of the other two as we have grown to prefer Hawaiian Red’s rich orange color and sweeter flavor. The white mango tastes like green, underripe mango, whereas the yellow is a little more spicy and pungent.
Actually, the darker orange varieties are healthier for you, it turns out! Little did I know when we first began growing turmeric, how deeply orange the color is a direct indication of how much curcumin it contains! Therefore, while the yellow and white varieties are distinctive and enjoyable to grow, they don’t offer the same nutritional benefit.
First, Where To Obtain Turmeric Seed?
Multiple methods exist for obtaining turmeric seed rhizomes. You’re in luck if you can locate organic turmeric in the produce section of your neighborhood supermarket. Because you can absolutely successfully grow turmeric from store-bought rhizomes! Actually, this is how we prefer to get our turmeric seed these days! It’s just too easy. Do seek out certified organic rhizomes though. Produce that is not organic is frequently treated with chemicals meant to prevent sprouting. The most likely places to find turmeric are natural food stores or Asian markets.
If you cannot find fresh organic rhizomes locally, or if you want to try growing specific varieties, you can also order turmeric seed rhizomes online. I am aware of Hawaii Clean Seed as the primary source. They have provided us with turmeric (and ginger) seeds on numerous occasions, and we have always been satisfied. Their ordering process, however, requires some navigating. As soon as they go on sale (November 1), you must place your order because they sell out quickly! Additionally, there is a minimum order requirement, and the seeds are shipped in February or March.
Once you are growing your own turmeric, you can save seed rhizomes from your harvest to replant! Alternatively, use everything and then purchase more.

How To Grow Turmeric?
Turmeric plants are herbaceous shrubs with a rapid growth rate that reaches heights of 3 feet. The rhizomes of already-existing turmeric are used to plant them; shortly after planting, the rhizomes sprout green shoots.
As an understory plant that is accustomed to growing beneath a tree canopy in the tropics, it will actually thrive indoors. Bright artificial sunlight and tropical shade are very similar.
Sprouting Turmeric For Planting
Before planting, I like to let turmeric sprout on the counter because it helps the plants get off to a good start. Otherwise, the rhizomes risk rotting before sprouting if the soil is too cool and wet.
Start by keeping the turmeric rhizomes in a warm, sunny location for a few weeks. To avoid sprouting, choose organic turmeric rhizomes as conventional turmeric is occasionally treated with growth inhibitors.
It’s time to plant the turmeric when a few tiny green sprouts appear.
(If you live in an especially dry area, it might be necessary to soak the turmeric in lukewarm water for about an hour once a week until it sprouts. In most places where the ambient humidity is at least 50%, this shouldn’t be necessary.)
You can plant the turmeric in containers (or outdoors in zones 8 and higher) once it has small sprouts and is actively growing.
Turmeric should be planted with its tiny growth tip upward.
Growing Turmeric In Containers
Fill a container with rich potting soil after the turmeric has sprouted. Any container with adequate drainage will support the growth of turmeric.
Ideally, the container would be relatively shallow (about 8″ deep) but have a very wide top. The lateral growth of turmeric occurs in the top few inches of soil. The turmeric will have more room to grow if there is more surface area in the pot.
With the green sprouts pointing upward, plant the turmeric horizontally in the ground, about 1-2 inches deep.
After planting, give the plants plenty of water, but between waterings, let the soil completely dry out. The rhizomes will rot if the pots are left to sit in water-filled saucers for an extended period of time.
To ensure that the turmeric plants get off to a warm start in the early stages, it may be helpful to place the pots on seedling heat mats. Set the heat mats between 75 and 80 degrees. As long as the plants are kept in a warm, sunny location and have several inches of green shoots, the heat mats can be turned off.
Although turmeric can be harvested repeatedly and in small amounts from plants grown in containers throughout the growing season, it is typically harvested about 10 months after planting.
Although I’ve discovered that turmeric grows much faster and produces better, the procedure is very similar to growing ginger. Turmeric (left) and ginger (right) were both planted in a container on the same day in the image below.
cultivating ginger and turmeric. Although they were planted on the same day, the turmeric (left) grows much more quickly than ginger (right).
Growing Turmeric Outdoors
In general, turmeric can only be grown outdoors during the summer months in zones 8 or higher.
Ten months before the average first frost, sow turmeric indoors. Our first frosts in Vermont typically occur in the middle of October. Thus, January is the ideal month to start growing turmeric indoors.
The young rhizomes do well when kept close to the woodstove in a sunny area. A heat mat would keep them at a more consistent temperature, which would be better for them.
Till the threat of frost has passed, keep the plants indoors and transplant them to bigger pots as necessary to accommodate additional growth.
When you plant tomatoes and peppers in the garden, also transplant turmeric outside along with other tender annuals.
Given that turmeric doesn’t thrive in the intense midday sun, be sure to pick a location with some shade. Keep in mind that it’s an understory plant and benefits from some sun protection.
Turmeric Growing Tips
- When cultivating C. longa as an annual, get a head start on the long growing season by starting tubers indoors with a heat mat.
- Be careful to angle protuberances upward to make it simple for sprouts to surface.
- From germination to maturity, keep the soil evenly moist; do not overwater.
How To Propagate Turmeric?
To grow your own C. longa, you’ll need tubers or established plants. You can buy “hands,” which are multi-section tubers, or “fingers,” the individual pieces of a hand, from your local grocer.
Nevertheless, depending on whether or not they received growth retardant treatment, they may or may not sprout.
It is preferable to purchase untreated tubers from an established nursery. You are likely to see them listed as “seed rhizomes.”
Rhizomes should be indoor-sprouted before being planted outdoors as soon as it’s safe to do so after your region’s last frost date for annual cultivation. You will be able to accelerate the 200–300 days it normally takes for plants to mature.
Start eight to ten weeks before the last average frost date for the best results.
Lay individual “fingers” horizontally in a well-draining seed-starter tray. Make sure to face the bumps or sprouts upward if they have bumpy protuberances or have already begun to sprout in order to hasten their progression through the sprout stage.
Add two inches of potting soil over them.
To keep the tray between 80 and 85 degrees Fahrenheit, place it on a heat mat.
Maintain uniform moisture, but avoid becoming overly saturated.
Transplant the sprouted fingers into the garden once the risk of frost has passed.
Continue to maintain even moisture by providing an inch of water per week in the absence of rain, and possibly more during dry spells.
How To Manage Pests And Disease?
Start with high-quality seed rhizomes or plants that have been bred for success to deter pests and disease.
Plant according to the instructions in soil that drains well and is rich in organic matter. Give the plants enough room to grow to their full potential and with adequate airflow between them.
Some common pests are:
- Grubs
- Leaf Rollers
- Nematodes
- Rhizome Flies
- Rhizome Scale
- Shoot-Boring Caterpillars
- Slugs and Snails
- Thrips
Diseases that may affect this plant include:
- Bacterial Soft Rot
- Bacterial Wilt
- Dry Rot
- Fusarium Rot
- Leaf Blotch
- Leaf Spot
- Pythium
- Rhizome Rot
Reduce the appeal to insects and pathogens by:
maintaining a weed-free garden to enhance airflow and lessen competition for water.
A plant that is too wet or dry is more susceptible to disease, so try to avoid both overwatering and underwatering.
How To Care Ongoing Turmeric Plant?
Water
Turmeric requires little care before it emerges from the ground. Provide occasional water – as frequently as needed so that the soil is maintained mildly damp, but not soggy. If necessary, insert your finger a few inches into the soil to determine its moisture content. To reiterate, those precious rhizomes are prone to rotting if they’re overly wet! We hardly ever water our un-sprouted turmeric until the weather starts to dry out and warm up because of sporadic spring rain and the gloomy skies.
Continue to water the turmeric once it has sprouted and is actively growing to maintain the same moist but not soggy soil condition. As it is now summer and the growing plant will be consuming more water, chances are you will need to water more frequently than you were before.
Reduce the water usage once more as fall transitions into winter, especially if you are getting rain. You can completely stop watering when you are one to two weeks away from the date you’ve chosen for harvest. This step need not be done if you are unsure. We simply discovered that in semi-dry soil, it is easiest to gently uproot the rhizomes.
Fertilizing Turmeric
Turmeric is a fairly heavy feeder when it is actively growing. It will enjoy compost and a few applications of well-balanced fertilizer throughout the season. Turmeric is frequently fed with aged, pelletized chicken manure. We give our turmeric a few different treats throughout the year to keep it content and healthy. We top-dress the soil around the plant stalks once or twice in the middle to late growing season (summer and fall) with a light dusting of kelp meal and alfalfa meal as well as a fresh 1 to 2-inch layer of compost and then water it all in.
A few mild liquid fertilizer options are also available from us. One is actively aerated compost tea, which we use to water the turmeric with every other month or so – in place of its routine watering. Visit this tutorial to learn how we make our compost tea. During the alternate months, we may water with a dilute seaweed extract solution instead. For people who don’t have homemade compost or the tools to make compost tea, that option will be simpler.
How To Harvest Turmeric?
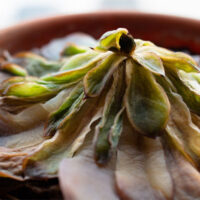
Turmeric leaves will start to turn yellow-brown and dry when it is time for harvest. Our outermost leaves do change to a lesser extent than our inner leaves. In the following harvest image, you can see the leaves. In addition to leaf appearance, use time as a way to determine when to harvest – an average of 10 months after planting.
Come harvest time, do not just yank up on the stalks! That could result in hand breaks for you. To loosen the soil around the turmeric stalks, gently dig down in a broad pattern with a trowel or your hands, being careful not to stab or harm the rhizomes. You can either gently pull up on the stalks or scoop them out from below once the soil has become looser. If you encounter resistance, you might want to tip the container over sideways and carefully sort through the contents. For an illustration of how we tip wine barrels onto a tarp for simple cleanup, see the example below.
After harvesting, rinse off the rhizomes to remove the dirt. Trim the rhizome hand carefully away from the stalk. Additionally, they may be attached by some strange, long roots that can be cut off with sterile scissors or snips and composted. Then, allow the skins to thoroughly air dry before putting them away in storage.
How To Clean And Store Turmeric?
After harvest, strip the turmeric rhizomes of all green growth and gently wash them to remove any dirt. After letting them completely dry, store them at room temperature.
Be aware that turmeric only experiences a brief period of dormancy and that these rhizomes are actually alive. They’ll eventually dry out or sprout, whichever comes first. They will last the longest if kept in a warm, moderately humid environment (40–60% humidity).
Turmeric is still safe to use after it sprouts. The cycle can also be restarted by simply planting more turmeric.
Cooking Ideas Of Turmeric
Today’s holistic health advocates call turmeric a “superfood,” and recommend consuming it with black pepper, to enhance its absorption and reap its benefits to the greatest degree.
Per the folks at the University of Florida Institute of Food and Agricultural Sciences Gardening Solutions, a one-inch length of fresh turmeric root equals one tablespoon fresh grated, or one teaspoon ground.
The flowers of C. longa are also edible, and the fresh foliage is sometimes wrapped around food for cooking or presentation.
Can you picture making a batch of curry with freshly harvested turmeric from your garden?
How about saving money by growing your subsequent crop from the tubers you harvested this year? Consider the thoughtful presents you could make for friends and family by drying and bottling your golden spice!
Turmeric Red Lentil Soup With Kale
Nothing is cozier than a large pot of legumes, like lentils. This particular soup is made using red lentils and is flavored with tasty turmeric and cumin.
Kale adds more nutrients and a pop of color that highlights green against red, making it look as good as it tastes. After all, we eat just as much with our eyes as we do with our mouths and stomachs.
Your dinner guests will beg for more of this colorful, filling vegetarian soup!
Krishna’s Golden Turmeric Tea
With this Indian-inspired tea, you can add a variety of antioxidants and micronutrients to your diet thanks to the fresh turmeric, fresh ginger, cardamom, cloves, nutmeg, and black pepper.
With this fragrant and delectable spiced beverage, you can keep your health and help prevent disease.
The Bottom Line
You can probably tell by now how much we enjoy cultivating turmeric around this homestead. You can start seed rhizomes well in advance of the growing season, even if you don’t live in one of its preferred growing zones, to give your plant a strong head start on the long road to maturity.
Please post your photos in the comments section below so that we can see how you’ll use this savory spice plant in your garden and on your dinner table this year.
Read More: