Indoor seed germination can be difficult. If you are interested in DIY indoor greenhouse, you’ve come to the right place.
From elaborate Victorian-era versions to more straightforward boxed sets, there are many indoor greenhouse gardens available for purchase. A DIY project is another option. It is frequently inexpensive and easy to build your own mini greenhouse using supplies you already have.
It’s not always simple to keep a space warm and humid enough. Keep reading, this article introduces how to build a DIY indoor greenhouse and its amazing benefits.
Table of Contents
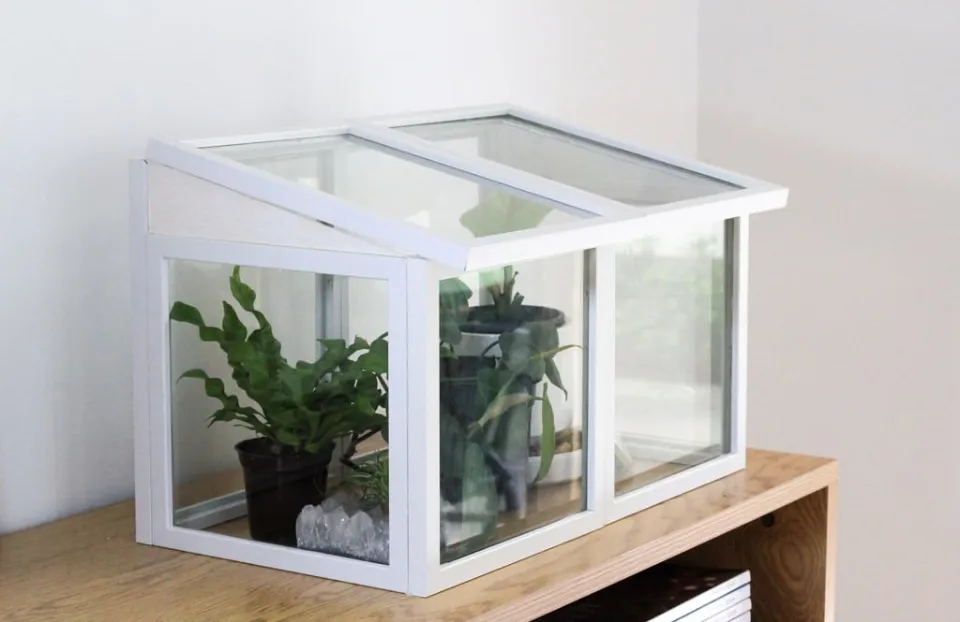
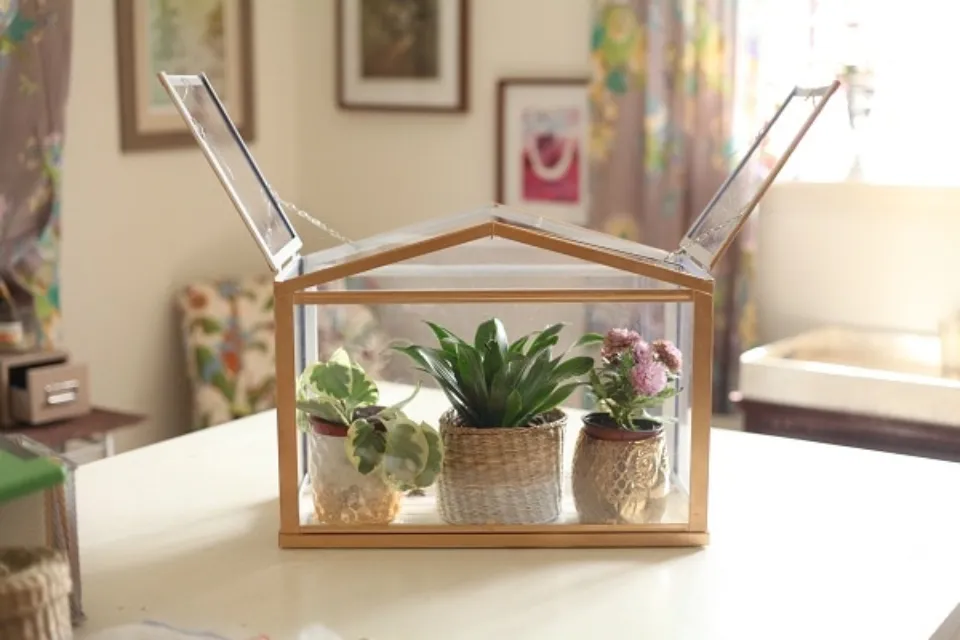
How to Build a DIY Indoor Greenhouse at Home?
A simple indoor greenhouse is a fun DIY project that the whole family can enjoy all year long, whether you’re trying to extend your growing season or you just want to enjoy gardening with your kids when it’s not warm enough to work outside.
Step 1: Plan It Out
You should make a detailed list of your requirements before beginning your greenhouse project. Choose the plants you want to grow and the long-term use for them before you start. Keep in mind how much space you have to work with as well.
There are several ways to construct one, and all you really need is a small area of your basement, garage, or spare room. Make the decisions that are best for your family and may also be the simplest for your children to manage.
For this project, we’ll concentrate on building a small indoor greenhouse with shelving, lighting, and a variety of planters or pots. Don’t worry about placing the greenhouse near a window or other natural light; there is no need, as you’ll be using electrical fluorescent lighting or grow lights.
Make sure the location of your greenhouse is close enough to an electrical outlet so that you can plug in a power strip for your lights.
Keep in mind the kinds of plants that will flourish in this setting. Some plants that thrive in greenhouses include ferns, gladioli, orchids, and begonias. Any additional advice or pointers should be sought from a True Value hardware store employee.
Step 2: Install Shelving and Lighting
Purchase a three- or four-tiered simple household shelving unit. Assemble the unit, following all manufacturer instructions.
Depending on the number of lights you install, you may also need one or two power strips. Utilize shop lights with hanging chains that can be attached to the shelving to direct the light directly down onto the shelf tier below. You can also use actual grow lights, but they are frequently more expensive.
By using cable ties to secure the power strips to the middle shelf, close to the back, you can keep them out of the way. You can plug in all of the power cords for your lights conveniently in this location. Follow all manufacturer instructions as you assemble your shop lights.
Use the chains and hooks on the shop lights to fasten them to the base of each tier. One of the lights must be suspended from the ceiling or another similar structure above the top tier if you intend to use the shelf there for planters. Adapters for shop lights should be plugged in.
Step 3: Select Or Make Planters
This is where some creativity can come in handy. Children will enjoy this aspect as well. Planters or pots that are customary are not required.
There are many things that can be used to make planters and offer you and the kids a creative outlet. Making a terrarium-style planter out of an aquarium is possible. Even tiny plastic cups can serve as acceptable planters for very small plantings.
One cheap way to create “pots” is to reuse 2-liter soda bottles. This is also another great way to “recycle” some plastic containers. Measure about 6″ from the bottom of the bottle and mark this spot with a marker. Then use a utility knife to halve the bottle there.
Step 4: Start Planting
You can either start your plants from seed or by planting plants with roots. The seeds should be inserted to the manufacturer’s recommended depth according to the instructions on the packets. Mist the soil with water, keeping the soil damp but avoiding over-watering.
Especially if your home is particularly dry during the winter, you might need to mist the plants every day.
Step 5: Cover It
If your greenhouse location is in a very warm, humid part of your home, your indoor greenhouse may not need covering, but you can cover your greenhouse with plastic sheeting to keep in warmth and moisture just like a full-size greenhouse.
It can be determined by trial and error whether or not to cover it. Just keep a close eye on your indoor greenhouse to determine what works best for you and your plants. The excess sheeting can be tucked behind the shelving or held in place with tape.
Alright! Now you and your kids have an indoor greenhouse. Let the good times continue to grow!
The Benefits of An Indoor Greenhouse
Protection from the Cold
The most obvious benefit of an indoor greenhouse is cold protection. Some plants simply cannot be planted outdoors if you live in an area with chilly fall and winter weather.
But when you bring them inside, the world of plant possibilities opens up. When you have access to an indoor greenhouse, growing tropical plants, seedlings, and even out-of-season vegetables, all of a sudden become options.
Yes, I suppose bringing the plants inside already provides some level of protection. But even places near windows or in front of a door that is unintentionally opened can quickly kill your plants in the winter. The ideal environment for growth is provided by a closed greenhouse, which maintains constant temperatures and reduces stress.
Better Environment for Your Plants
An indoor greenhouse can provide assistance with a variety of environmental factors, not just temperature. You can easily create the ideal environment because the cabinet is enclosed and closed.
Adjustable grow lights give you strict control over light levels, whether you are growing sun-dependent succulents or shady houseplants. Any tropical beauties will be much happier with a humidifier than they would be if they were exposed to the dry air. Insect damage is avoided because pests have limited access to the plants.
This control over plant maintenance makes the process much simpler for people with so-called “black thumbs” who can’t seem to keep any plants alive.
Saves Money
The only people who are eligible for this benefit are those who grow vegetables, fruits, and herbs in an indoor greenhouse. Growing your own food will allow you to avoid weekly grocery bills if you have enough space for produce.
By limiting your movement to where you decide to put the greenhouse (a tip: keep it in the kitchen for the easiest access), you also avoid having to make trips to the grocery store for any fresh items.
Those who really want to grow their own food but lack the outdoor space should consider this option. This leads to our next benefit…
Dedicated Space to Garden
An indoor greenhouse marks out a space in your home exclusively reserved for plants. An indoor greenhouse prioritizes easy access and care over having houseplants scattered throughout various rooms, which may cause you to forget about a few of them.
For those with small gardens or perhaps no outdoor garden space at all, an indoor greenhouse will make a world of difference. You can grow almost anything without needing even one square foot of outdoor space, depending on the size of your cabinet. From microgreens to cacti and more, the options are endless.
Interesting Décor Feature
Finally, a well-lit indoor greenhouse has aesthetic value that cannot be overstated. This is by far my favorite benefit and the reason I chose to tackle this DIY project in the first place.
I take care of more than 50 indoor plants, and I’m always thinking of creative ways to display them. This cabinet was made specifically to be placed in low-light areas of my house where houseplants struggle to grow without additional lighting support.
It blends in perfectly with my interior design and, as a result, makes the plants the focal point of the space.
Make sure you select a stylish, high-quality cabinet that blends in with the rest of your interior to maximize this benefit. Although there are certainly less expensive options that don’t require much adjusting, they might not look as good as a DIY cabinet that is specifically designed for the location.
Final Words on DIY Indoor Greenhouse
Really, creating a mini-DIY greenhouse can be as easy or complex and as expensive or cheap as you want to go.
Or, of course, you can just go out and buy one, but where’s the fun in that?
Read More:
FAQs
What Can I Grow in a Mini Indoor Greenhouse?
In the Summer, the mini greenhouse can be used for protected crops such as tomatoes, peppers, cucumbers and aubergines.
What Temperature Should Indoor Greenhouse Be?
Generally, the ideal summer temperature for a greenhouse is 75-85° F during the day and 60-76° F at night.
Does An Indoor Greenhouse Need Ventilation?
In your small greenhouse, ventilation is essential for managing humidity levels and temperature.